


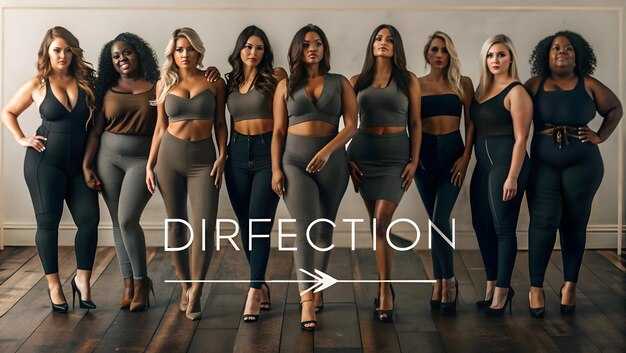
 How Differences in Female Body Shapes Impact Clothing Fit" >

Begin with precise measurements of shoulder width, bust, waist and hip, then select garments with adjustable elements and thoughtful darting to achieve a flattering silhouette. When the shoulder line follows the natural slope, the şekil reads as more balanced, helping attractive lines stand out without pulling at the seams.
In university-led studies, results show that aligning the garments’ width distribution with measurements yields more consistent wear across different şekil types. Using a diverse sample, researchers observed up to 28% less fabric pulling at the bust and waist, and an average 12–18% improvement in perceived balance across activities.
The garavani method promotes modular tailoring: replaceable panels, adjustable shoulder seams, and strategic darts to adapt to shifting şekil proportions. Developed by garavani, this method emphasizes using a small set of core fittings, which can be replicated across sizes to maintain a consistent, visually balanced look.
For cases where the shoulder is broader or narrower than the hips, use accessories and styling tricks to compensate. A bold necklace or scarf can draw attention away from width imbalances, while a V-neck or boat neckline visually narrows the upper width. Either approach should preserve the şekil without compromising comfort.
In practice, brands can implement this thinking by testing a small developed set of patterns: adjust the shoulder line by 1–2 cm, add 2 cm extra at the bust for larger şekil, or provide side panels that can be opened or closed using discreet zippers. A determined design logic underpins these steps, and the results show garments becoming more attractive and flattering across a wider şekil spectrum.
To sum up, the goal is to make garments that look well on more types of şekil. The makhanya approach, tested in boutique lines, uses multiple prototypes to identify the best combination of seams, width distribution, and accessories. By combining evidence-based adjustments with shopper input, retailers can deliver options that feel attractive and flattering from first wear to multiple uses.
Practical Fit Scenarios by Body Shape
Recommendation: Using real scans, categorise each client into a category, then designing a base pattern in a chosen size and applying a fibonacci sequence to adjust ease while maintaining a harmonious line. Start with cropped tests and oversized samples to rest on the shoulder slope and waist alignment, then harmonize to real wear. Bonnie’s approach shows how such identification of sizes supports those forty and beyond.
-
Lean, rectangular silhouette
- Identification: use scans to assign this form to the baseline category with minimal bust fullness and modest hip flare.
- Pattern adjustments: add subtle darts at the shoulder (0.5–1 cm) and taper side seams using a fibonacci sequence (1–1–2–3–5 cm) to create natural curvature.
- Testing: produce cropped and oversized tests to check rest at the upper chest and waist; verify that long lines stay harmonious when seated, standing, or moving.
- Conformance note: aim for a balanced chest-to-waist transition; apply ffit scoring to compare before/after and adjust accordingly.
-
Average-to-curvy torso with moderate bust and hip presence
- Identification: scans place this form in a broad category where bust darts are more pronounced and hip ease is increased.
- Pattern adjustments: widen the bust dart by 2–3 cm and broaden back shaping; use a cropped length for testing the neckline while preserving rest at balance points.
- Testing: compare cropped and oversized versions to ensure the bust lies smoothly without pulling at the armhole; adjust shoulder width if needed.
- Notes: in douty istook, this category benefits from a slightly higher front waist seam to maintain proportion; document changes in the category file for consistency across sizes.
-
Fuller bust with a broader rear contour
- Identification: real scans show pronounced upper-front fullness and back width, requiring additional chest and upper-back ease.
- Pattern adjustments: add 2–4 cm at the chest, redistribute ease into the back seam, and extend the shoulder slope by 1–2 cm to prevent pinching; use cropped reference lines to confirm fit around the neckline.
- Testing: compare standard and oversized samples, focusing on armhole comfort and waist alignment; ensure hip line remains free of strain when seated.
- Harmonize note: group those with similar measurements into a single category to simplify future designing and ensure consistency in identification across sizes.
-
Tall, long-torso form
- Identification: scans reveal extended torso length; adjust pattern length and sleeve cap height to prevent shortened appearance.
- Pattern adjustments: lengthen the torso by 4–8 cm following the fibonacci sequence (1–1–2–3–5 cm steps); crop tests help verify line before finalizing full-length options.
- Testing: verify that the hem sits at the intended point when cropped and when extended; ensure the rest at the bust and shoulder remains comfortable.
- More: apply remaining adjustments to similar tall-frame clients to maintain a harmonious silhouette across categories.
Bust, Underbust, and Cup Size Influence on Tops and Blouses
Measure bust, underbust, and cup size to select tops and blouses; this application enhances accuracy when aligning shoulder seams and bust darts. Record bust circumference, underbust, and cup depth in a file for consistent reference, and consider using scans from a service or home technique to confirm results.
Cup size refers to the difference between bust and underbust, shaping how fabric falls over the chest. For each slight increase in cup volume, add approximately 2–4 mm of ease at the cup apex; the depth is determined by cup size, and adjustment involves mass and weight balance. The dividing line between bust and underbust is critical for darts and vertical shaping, ensuring fabric rests smoothly across the ribcage. If mass concentrates toward the midsection (as with an apple or douty profile), neckline and shoulder seams render tension that can pull toward the neck; plan seaming to elevate comfort and balance, which renders a more proportional look.
Somatotyping informs pattern build. Forty-year profiles often show posture shifts over years that alter how tops sit on the torso. This approach involves shoulder slope and upper-chest volume; refer to a standardized chart to determine if adjustments are needed. istook in a historical note suggests adding vertical darts or a princess seam to distribute mass more evenly and reduce out-of-proportion tension across the cup area.
Practical steps: use shoulder measurements to verify cap height and ensure the bra line aligns with the neckline. Scans and measured data should be compared against a reference table; if bust measurement exceeds underbust by more than two inches, consider a larger cup option or adjustments on the side seams. Elevate the silhouette by rotating shaping darts away from the peak toward underbust, and test with a muslin to verify rest across the chest. This approach will build comfort, support, and balanced mass distribution in tops and blouses.
Waist-to-Hip Ratio and Garment Ease in Dresses and Jeans
Recommendation: an applied, proportions-based approach based on comparative data–target modest waist ease and controlled hip ease that supports a harmonious silhouette. Start by assessing waist-to-hip proportions and translate them into garment ease: those with stronger hip mass benefit from slightly more hip ease while preserving waist definition for the rest of the line.
In dresses, align the cut with weight distribution: use darts or a defined waist seam and introduce a gradual flare from the hip to the hem. For similar waists, a balanced approach yields best visual rhythm; shoulders should retain line without pulling forward, ensuring elegance at rest and during movement.
In denim, prioritize seat and thigh ease without bloating the waistband. A straight or subtle bootcut leg with 1–3 cm more ease through the hip and thigh typically improves comfort for those with higher hip mass, while keeping the waist rest clean and accessible for seating. Check back rise and waistband curvature for accuracy.
Factors such as weight distribution, posture, and developed musculature influence the final line. Use a comparative evaluation and measure at the waist, high hip, and full hip, then compare to a reference size chart. A visual check confirms a beautiful balance and rest of ease along the silhouette.
The garavani principles emphasize a harmonious silhouette by balancing mass and restraint. Apply these notions to both dresses and jeans to achieve an appeal that remains comfortable through movement; ensure the upper body alignment complements the hips, avoiding tension in the shoulders or neckline. University studies support this approach as consistent with design principles and practical wearability.
Practical checklist (alphabetical): accentuate proportion with tailored waist lines; rest fabric around the hip; what to adjust: waist dart, side seam ease, back rise. Visual cues include measurement accuracy at center front, seat seam alignment, and shoulders’ balance.
In summary, apply these principles to dresses and jeans, delivering harmonious proportions and a beautiful appeal that stays comfortable across those variations.
Torso Length Variations and Hemline Interaction for Dresses and Tunics
Identification of torso drop category guides hem selection: short drop, standard drop, or long drop, using shoulder-to-waist measurement; for each category, select a hemline that preserves vertical balance and leg proportion: knee to mid-calf for short drop, mid-calf to ankle for standard, and ankle to floor for long drop.
Sectioning approach in designing garments relies on clear parameters: front and back panels, side seams, waist placement, hip ease, hem distance, and neckline shape; align pattern blocks with consistent ease to ensure general coherence; apply alphabetical labeling for sizes from XS through 3XL to track adjustments as part of the process within this section.
Triangles function as a length-modification technique: insert triangular segments into the side seams to elongate the vertical line without adding bulk; this technique enhances drape and has a positive effect on the hem contour when moving; position triangles to begin near the hip and finish at the lower seam to sustain length consistency.
Sizes and category-specific guidance: for smaller to average builds, knee-to-mid-calf hemlines yield the best looks with standard necklines; for fuller or longer torsos, midi to ankle lengths are often most attractive, aided by vertical seams and color-blocking that guide the eye; this practical approach supports appeal across years of wear.
Golden-section planning and testing: aim for a length ratio based on the golden section, roughly 0.618 of the torso length, to captivate observers; validate by draping on a form and adjusting parameters until the silhouette remains balanced in both standing and walking; such evaluation, that difference between attempts can be subtle yet meaningful and often considered by designers, leads to captivating results.
Shoulder Width and Sleeve Cap Fit in Jackets and Coats
Recommendation: choose jackets whose shoulder width matches the widest point of your shoulder and ensure the sleeve cap sits smoothly, without puckering or excess fabric during motion.
Guidelines start from a simple principle: balanced proportions between the shoulder line and cap depth create a harmonious, appealing silhouette. Measure shoulder width at the acromion, armhole depth, and sleeve cap height, then compare to the pattern. For tailored pieces, allow a 0–4 mm difference between measured shoulder line and pattern; for casual outerwear, 6–12 mm difference can be acceptable to preserve movement and whole comfort.
Method and classifications in practice draw on somatotyping concepts. somatotyping starts with classifications used in university curricula to group individuals by shoulder breadth and upper-arm contour, then informs how much cap ease is needed. источник: these classifications underpin a data-driven approach to sleeve head balance across participants and individuals. Designers can apply these insights to keep the whole look balanced and captivating for different physiques.
Rule for designers: aim for a shoulder seam that sits cleanly on the natural shoulder and a sleeve cap that follows the armhole curve with moderate ease. The principle is very clear: align the cap peak with the arm’s bending arc to prevent pulling during forward movement. Guidelines emphasize consistency across the entire garment, producing a balanced, appealing result that resonates in terms of terms of comfort and silhouette.
Hip Contour and Skirt Pleating for Movement and Comfort
Adopt a variable-width pleat sequence that mirrors hip contour to maximize mobility and comfort across all motions.
Divide the pattern into crest, mid-hip, and lower-hem zones, aligning pleat forms with weight transfer and leg swing. Use narrow, directional folds near the crest and mid-hip to harmonize back view with the ensemble, while selecting looser gathers toward the hem to allow a natural stride without bulk around the shin.
Data from average scans across populations shows hip profiles vary by region; in slovenia datasets the crest tends to be flatter and benefits from tighter pleats, whereas bsas measurements indicate greater vertical curvature that favors a mix of soft gathers and slender knife folds. Such findings help designers identify unique contour norms and inform a build process that accommodates multiple individuals within a single pattern family. The goal remains to provide a versatile system that supports a wide range of forms and movement terms, while keeping hem clearance clear and the silhouette clean from back view.
| Zone | Pleat Style | Width Range (cm) | Movement Benefit | Notlar |
|---|---|---|---|---|
| Crest (upper hip) | Inverted box + subtle knife | 2.0–4.0 | Increases flexibility for forward swing | Align with weight transfer; shin clearance maintained |
| Mid-hip | Knife pleats | 1.0–2.5 | Preserves silhouette during walking | Supports a smooth back view; harmonize with shoulder line |
| Lower-hem | Soft gathers or box pleats | 3.0–6.0 | Adds subtle volume for stride | Avoid bulk near knee; length above shin preferred |
To proceed, build a small library of forms identified by contour data from average scans, then link each pattern to an ensemble of fabric weights and weight distributions. Among the datasets, include references from slovenia and bsas to broaden the identification framework. This approach helps back the design process with tangible terms and supports equal outcomes for individuals, ensuring a huge range of fits without compromising view or comfort. The workflow should be tested in real tests with a few test ensembles to confirm that the pattern can harmonize movement, and to verify that the width allocations and pleat sequences map cleanly to different torso and hip configurations. The result is a unique system that can be shared across teams, again providing guidance that is easy to adopt and adaptable to various garments and shapes.


